At the beginning of 2022 our tenants in the old “Savings and Loan” let us know that they would not be renewing their lease when it ended in April. With the current business boom in Council Grove, we weren’t too worried about finding another renter, but we knew it needed an updating pretty badly. Being owned previously by a carpet and furniture store, it looked like it was the lucky recipient of several flooring job leftovers. There was click together “wood”, 80’s-ish high pile carpet, and weird vinyl tiles that were grouted so they looked like stone? The suspended ceiling and gridded fluorescents throughout had yellowed with age and made the place feel cavernous.
By the time the space was vacated and we were able to get measurements and start wrapping our brains around what we should do, we already had a new tenant lined up and ready to move in. Not really even recovered from our April/May remodel when we expanded the coffee shop area, we geared up to give the old girl a much-needed makeover.


Demo: the first thing when working with an old building is peeling back the layers of remodels and “updates” that have happened in the past. The second thing is knowing when to stop peeling before you uncover something insanely expensive to repair. Obviously if you suspect something compromising the integrity of the building you must proceed to make the space safe; but I’m talking the general pivots you have to make in your plans when you make a discovery that forces you to change your plans.
Case in point: the first order of business in the demo process was to tear out all floor covering. We knew a decision would need to be made on what we would replace it with and to do that, we had to know what condition the floor was in. This was a bit anxiety-inducing, given the flooring nightmare we had experienced next door in our own space remodel. Also, with the supply chain being what it is right now, we figured we should get something ordered asap. Piper and Gracie had most everything cleared out in the span of a couple of afternoons and we had several not-so-great surprises awaiting us: a labyrinth of patches from walls, rooms and even a staircase that had been removed at some point in time. Toward the front of the building, I chipped through the subfloor to see if I had the standard tongue and groove wood you find in most of these turn of the 20th C. buildings. Good news: wood! Bad news: strange layer of black felt overlay that would be an absolute nightmare to remove. This made the decision for us – we had peeled back far enough! To go further would push beyond both our time and budget constraints, so the decision was made to order carpet tiles.
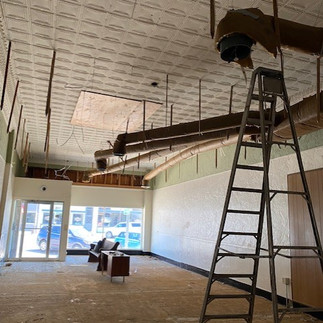
Demo continues. We get some help from Cade, who spends a couple mornings pulling down the light fixtures. Then he and Piper pull down and haul off the suspended ceiling. No surprises here for the most part, mostly because we’d done a fair amount of nosing around prior to this. Again, the standard for most the buildings in our historic downtown: pressed tin! And in relatively great shape! There was an unfortunate patch where the skylight had been, and the dreaded brown octopus of insulated ductwork. Still, the space was very workable, considering some of the messes we’ve been in. We trimmed the plywood patch to square it to the grid of the ceiling tiles a little more (essentially preparing it to “disappear” as much as possible) and tore down the ductwork, putting in a call to our local HVAC company.
The next big concern was lighting. We knew we were removing 14 fluorescent fixtures from the space. Granted they were pretty dated and didn’t put out as much light as the modern options, but we wanted something that would look nice as well as provide plenty of illumination, given the fact that the space only received any other light from the front windows. They also needed to be able to be suspended, now that the space had roughly 14’ ceilings. A quick lesson on lumens and footcandles, as well as a super convenient online calculator helped us settle on some sleek LED fixtures would be more than sufficient to light the space.
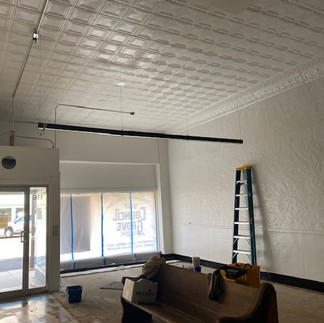
We began to prep the space for paint. We wanted to keep the look fairly clean and bright and simple, so a fresh coat of soft white as in order. Piper got the task of masking off the black marble base trim, which she was thrilled about.
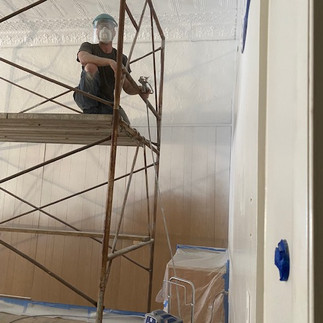
Our friend Rick loaned us his paint sprayer, which made the job so much easier! Highly recommend. We had scaffolding already set up from having to patch over holes in the ceiling where electrical had been at some point, and buttoning up some framework above the front windows we had exposed with the ceiling removal. This worked great for painting – Bob ran the sprayer and Lowell pushed him from one area to the next. They only had to stop to refill the sprayer and clean the overspray off his face shield so he could see! The dark green we found on the top 3 feet of the walls didn’t particularly want to cover, and the paneling we peeked behind and decided we like a lot looked much better with a second coat by hand. It’s amazing what a little (or a lot) of paint will do for a space! This really made us feel like we we’d turned a corner, where we started getting excited to see the finished product!
Unfortunately, this is where we hit a small hiccup. This remodel, as most remodels are, was really a long series of hiccups, most of which have been omitted to keep the blog from being a novel. 😉 Carpet tiles had been ordered. We checked the order status to estimate when they would arrive. Order had been inexplicably cancelled. Multiple calls later, they were reordered. Several days later checked status again. Cancelled again. More emails and phone calls. Have you ever tried to explain to someone who may or may not have English as their first language that you are calling to confirm that two orders you placed, that were cancelled, are indeed not really orders out there that are going to double-charge your account and drown you in Fed Ex delivered carpet tiles? Lesson learned – should have gone local to begin with. If there is any increase in cost, you most certainly recoup that in the service you get. Our friend UL came to the rescue. Brought samples by and had them ordered the same day. It was such a relief we decided to just go ahead and ask him and his crew to install them as well. The floor was by far the roughest spot in the joint, so we were elated to hand it over to professionals to make it look as good as possible.
Back on track with the carpet, we needed to get the lighting hung so we could get the scaffolding taken down. The first time we flipped the switch on those babies – wow! So much light. We’ve already been asked multiple times about them, so let me just go ahead and leave a link for them here.
While waiting for the flooring crew, we decided to prep the area in front of the door for some peel and stick tile. We know, we know; and believe it we heard it from UL when we showed it to him and asked him to install it, but the pattern was SO COOL and the only other place we’d been able to find it in a different product was the UK (££££). It was getting installed in two areas: the back NW corner where there was going to be a small sink area, and in front of the front door. The latter had been the location of the grouted fake-stone tiles, and removing it revealed more of that God-forsaken glue we had found over on our side that sucked our shoes right off our feet. Knowing the hills and valleys in the glue tracks would translate to bumps and ridges under our new tile, we decided to try to remove it. We knew that the floor underneath was some sort of marble or natural stone, because it was visible through the glue; but our previous experience with trying to remove said glue deterred us from incorporating it into the design plan, that along with the fact that the tile only appeared to run along the east wall. This was perhaps one of the few difficult moments of the remodel. Unexpectedly the adhesive came up off of the tile with nothing more than water, a straight edge, and some elbow grease. Once they were cleaned up and shining, it was pretty difficult to cover them up. If we had made this discovery earlier we likely would have made the tile a feature of the space and tailored the rest of the finishes to compliment it. But we were too far in to the process at this point and chose to go ahead and cover them up. The next generation of remodelers will write a blog someday wondering why some dummy covered it up, lol!
The flooring install was excruciating! Only because we were so excited to see the finished product. Several applications of leveling compound and the glue having to cure before the tiles could be laid section by section had us on pins and needles, but the end result brought the space to the next level. After that it was really just about finishing touches. We had wanted something simple but grand to be seen from the street, and this chandelier really fit the bill!
We went right down to the wire on this one, with our new tenants having to pull a couple of long days assembling furniture to be ready for their open house, but it was a smashing success: welcome to your new home, Council Grove/Morris County Chamber of Commerce! We hope you’ll be very happy here. You’ve got some pretty amazing neighbors!
Thanks for reading about our latest remodel adventure. We didn’t include the exterior work we did here. Stay tuned for our next blog installment – it will include both this and the painting of our other two facades!


Comments